Friday, July 4, 2014

0 comments 7/04/2014

Honey Green Tea (Matcha) Latte

Posted by SnOwySnOwy - Filed under , ,
For the past week, I have been making this green tea (macha) latte.  I like the color and taste of it. This is a better alternative to a regular latte if you would like to consume less caffeine and at the same time want to avoid the chemicals in most of the decaf coffee.

 
In many of the videos that I saw on making this latte, most of them use a milk frother wand to mix the green tea powder with some sort of liquid. Originally, I wanted to buy a more expensive milk frother (the Aerolatte one) for that but ended up getting an IKEA version of it for only $3.99.  I am so glad that I bought the IKEA version because it works just fine for this purpose.  Below is a picture of the IKEA version of the milk frother.
 

Honey Green Tea (Matcha) Latte

ingredients

  • 1.5 tsp green tea powder
  • 2.5 tblsp hot water (not boiling)
  • 1 tsp honey
  • 1 cup of milk (you can use less if you prefer a stronger taste of green tea)

preparation

  1. Sift the green tea powder into a cup
  2. In another cup, mix the hot water and honey
  3. Add the hot liquid into the powder and whisk vigorously (use the frother) until powder is all dissolved
  4. Steam and froth the milk (I used the steam wand from my espresso machine)
  5. Add the hot milk to the cup

... more ...

Tuesday, June 17, 2014

0 comments 6/17/2014

Classic Butter Cake

Posted by SnOwySnOwy - Filed under , , ,
I really want to share this buttercream and cake recipe because it is so easy to make and the result was great too.  The cake tasted moist, it feels like a just right wedding cake (not too dense and not too fluffy) and the best part of it is that it is very easy to make.  I don't bake cake a lot, the only reason I made this last week was mainly for experimenting with fondant and be able to have a pretty looking cake for Baby Sister J.  As a result, I started to look for simple vanilla cake recipe.  At the end, I used a recipe which I got from a cupcake decorating class a couple years back.  Note that I did not make any alterations to the recipe except to add 2 pods of vanilla bean to the cake recipe and I think the sweetness and the texture turned out just right.

It was too bad that I did not take any photos in the process of making the cake and I totally forgot to take a photo of the cake after it has been cut.  However, here is the final product and Happy 100th Days to my little J!


I made the fondant baby shoes with this template http://bronniebakes.com/2013/09/30/how-to-make-fondant-baby-shoes/

Swiss Meringue Buttercream Recipe

ingredients

  • 12 oz (336 g) egg whites (10 large egg whites or about 1 1/2 cups) at room temperature
  • 3 cups (680 g) granulated sugar
  • 3 lbs (1.36 kg) unsalted butter, room temperature
  • 2 Tbsp lemon extract, almond extract, orange extract, or pure vanilla extract

preparation

  1. Lightly whisk egg whites and sugar together over simmering water until egg-white mixture is hot to the touch or a candy thermometer reads 140°F (60°C).
  2. Pour hot whites into a room-temperature bowl and whip with a wire whip until double in volume on MEDIUM-HIGH speed. When the mixer stops, the meringue should not move around in the bowl. Meanwhile cut up butter into 2-inch pieces. (The butter should be slightly moist on the outside but cold inside.)
  3. On your mixer, remove the whip and attach the paddle. Add half the butter (1 1/2 lbs or 680g) into the bowl immediately and pulsate the mixer several times until the meringue has covered the butter completely. To pulsate the mixer, turn it on and off in a jerky motion. This forces the butter on the top to the bottom of the bowl. Add the balance of the butter (1 1/2 lbs or 680 g) and pulsate mixer several times. Slowly increase the mixer's speed, starting with the lowest speed and increase the speed every 10 seconds until you reach a MEDIUM-HIGH speed.
  4. Continue beating until the mixture begins to look light and fluffy. Stop the mixer and scrape the bowl. Reduce speed to LOW. Add flavoring and continue to beat on LOW speed for 45 seconds. Then beat on MEDIUM-HIGH speed for an additional 45 to 60 seconds.
  5. Leftover buttercream can be placed in plastic containers with lids and kept in the freezer for up to 3 months. Defrost completely (several hours) and rewhip before using.

Note: In hot weather, use 2 lbs 10 ounces (1.19 kg) of butter and 6 ounces (710 g) of hi-ratio shortening. Hi-ratio shortening is emulsified and contains water.

Storage: Store the icing in an airtight container and freeze for up to 3 months.

Yields 2 1/2 quarts

For my cake, I halved the ingredients and still had a lot more left over after I covered the cake.

Classic Butter Cake

ingredients

For 2 layers:
  • 2 3⁄4 cups cake flour
  • 2 tsp baking powder
  • 1⁄4 tsp salt
  • 1 cup unsalted butter at room temperature (8 oz/250g)
  • 2 cups sugar
  • 4 large eggs at room temperature
  • 2 tsp vanilla extract
  • 1 cup whole milk at room temperature
  • 2 pods of vanilla bean (I added to this recipe)
Make two 9 inch round layers

preparation

  1. Remember to bring the butter, eggs and milk to room temperature. This is very important to ensure the batter is mixed properly.
  2. Preheat oven to 350 degrees Fahrenheit. Prepare tins and line with parchment paper.
  3. Sift dry ingredients, flour, baking powder, salt.
  4. Combine butter and sugar in mixer (I followed the directions here to cream the butter and sugar, remember to be patient to cream the butter well first before adding in the sugar: http://www.instructables.com/id/How-to-Cream-Butter-and-Sugar-by-Hand-or-with-a-M/). Use paddle attachment and mix on medium speed until the mixture is light and airy and changes to cream about 2 mins. Add the eggs one at a time beating for 1 min after each addition. Stop the mixer regularly to scrape down the sides of the bowl. After all of the eggs have been added, add the vanilla extract and beat for another minute. Reduce the speed to low and add one third of the dry ingredients and mix until incorporated. Next add one half of the milk and mix until incorporated. Continue alternatively ending with the dry ingredients.
  5. Pour the batter and bake undisturbed for 30 mins.


... more ...

Sunday, June 23, 2013

0 comments 6/23/2013

Strawberry season is here!

Posted by SnOwySnOwy - Filed under , , ,
It has been a long while since I last blogged. Baby J is no longer a baby, in fact, he is now a preschooler.   Haha .. time really flies, and another summer and strawberry season is here again!

We went to the Organics Family Farm to pick strawberries today (also with J's first bff and family). It started to pour heavily when we just started to pick, fortunately, K was smart, he brought his golf umbrella with us and we avoided to get ourselves wet while J and I picked the strawberries.

The crops were very nice this season and we were able to fill our 7L basket quickly in the rain.   J (and me too) had a lot of fun despite the rain.  I do not think it is cheap to pick our own strawberries as the 7L of strawberries was $23.50 + $2 for the wooden basket.  However, J enjoyed it both years that we have went so far and it really made the fruits so much more enjoyable that he knows he had picked them himself.  We will definitely go again next year. ^^

As soon as we washed them, J ate many already. However, we still had many left and I decided to make strawberries jam using my bread machine.  I really love my DeLonghi bread machine, it can do so much more than just making fresh and tasty bread.  The recipe I am using for the strawberry jam is one that came with the DeLonghi bread machine recipe book and I modified it a bit (changing apricot with strawberry and used less sugar).  Hope this recipe works for anyone who is not using a bread machine as well.  Enjoy! ^^

Strawberry jam made with the bread machine.


A small portion of our crops.


My lovely bread machine.

Strawberry Jam

ingredients

  • 9 oz ripen strawberries
  • 6 oz sugar
  • 1 tbsp water
  • 2 tsp lemon juice
  • 1/2 oz pertin
  • 1/2 oz butter

preparation

With my bread machine, it was simple. Place all ingredients into the pan, set the program to use, scrap off the sugar on the side occasionally at the beginning of the cycle. After the program is completed (about 1h25min), pour the jam into the jar.

Yields 1 300ml jar.

... more ...

Saturday, November 17, 2012

0 comments 11/17/2012

Pumpkin Soup

Posted by SnOwySnOwy - Filed under , ,

Pumpkins were everywhere in October and I made my first pumpkin soup from a pumpkin that Baby J picked.

The recipe I followed was again super simple and worked.  Baby J loved it and cleared his bowl. ^^


Pumpkin Soup

ingredients

  • 6 cups chicken stock (I used 4 cups of chicken stock and 2 cups of water)
  • 1 1/2 teaspoons salt
  • 4 cups pumpkin puree
  • 1 cup chopped onion
  • I skipped the parsley
  • 1/2 teaspoon chopped fresh thyme
  • 1 clove garlic, minced
  • 1/2 cup heavy whipping cream (I used table cream instead to cut down the fat a little bit)
  • 5 whole black peppercorns (I used 2 instead because of Baby J and took them out before I pureed the soup)

preparation

Heat stock, salt, pumpkin, onion, thyme, garlic, and peppercorns. Bring to a boil, reduce heat to low, and simmer for 30 minutes uncovered.
Puree the soup in small batches (1 cup at a time) using a food processor or blender.
Return to pan, and bring to a boil again. Reduce heat to low, and simmer for another 30 minutes, uncovered. Stir in heavy cream. Pour into soup bowls and garnish with fresh parsley.


Yields 8 - 10 servings.

... more ...

Saturday, October 13, 2012

0 comments 10/13/2012

Scaramouche Restaurant

Posted by SnOwySnOwy - Filed under , , ,
We took Baby J to Scaramouche Restaurant a few weeks ago and we soon realized that he has an expensive taste! ^^  Previously, whenever we take Baby J out for dinner (even at Terra Restaurant), he was never a big fan of "western" food, he usually would take in a lot of bread and only take a few bites of the mains (usually some form of pasta).  However, at Scaramouche, he enjoyed everything from the appetizer to the dessert.  Just his portion of the meal was around $40+ and he is only 21 month ... haha ... but we are very happy that he enjoyed the meal as that meant we were also able to enjoy ours.

I will not go into details on how great a restaurant Scaramouche is because there are already many great reviews about it online.  As a result, here are the photos of the food.

Baby J's first dish - butternut squash soup.  He loved it so much that this was the first time we saw him drink soup with an open bowl and not using his spoon.

Amuse Bouche - poached quail egg, top with scallion and something else (cannot remember) but it was good. :P

Baby J's main dish - herb pasta sheets/wild mushrooms/grilled leeks/parsley truffled porcini sauce/shaved Umbrian summer truffle.  This was not a full size portion of the pasta from the main menu as the server was nice enough to let us know that the chef can make Baby J a half-sized portion.  Baby J finished more than half of the dish.

K's appetizer - Foie Gras Terrine elderflower jelly/quick pickled cherries/cherry wine reduction toasted hazelnut brioche.

My appetizer - Dungeness Crab Ravioli scallions/sweet peppers/haricot vert/chives/shellfish nage.  Baby J also liked this a lot too to the point that he was upset when he dropped a quarter of the ravioli to the ground while transporting it to his mouth with his spoon.  I liked my pasta appetizer a lot as well and more than K's appetizer.  It was refreshing and just the right amount to not spoil the main of the meal.

My main - Braised beef short ribs and seared sea scallops.  The scallops were one of the tastiest I have had and made me wondered which type of scallops they were and how they were marinated and cooked.

K's main - Lamb roasted rack/grilled leg/caponata/goat cheese whipped potatoes salsa verde/cherry tomatoes/pine nuts/lamb jus.  I liked my main better though. ^^

Dessert - their signature coconut cream pie.  We shared the dessert as we were full and have to be quick since Baby J was already tired after 2 hours of patiently waiting for his dishes and eating his meal.  Looking at the picture again now ... I wish I can have another piece now. ^^

A quick summary of our experience, yep, we will definitely return again because everything was excellent and Baby J loved it.

Scaramouche Restaurant

One Benvenuto Place
Toronto, ON
M4V 2L1

Tel: 416.961.8011

Scaramouche on Urbanspoon

... more ...

Saturday, August 18, 2012

0 comments 8/18/2012

George Restaurant - 4-course Tasting Lunch Menu

Posted by SnOwySnOwy - Filed under , , ,

K and I feel that it is good to have some quiet and relax time between the two of us for us to recharge once in a while.  As a result, earlier this month, we went to George Restaurant for lunch while Baby J was in school (yay! ^^).  We ordered the $60 4-course Tasting Menu because we had the whole afternoon to ourselves and were able to afford a 2-hour meal quietly.


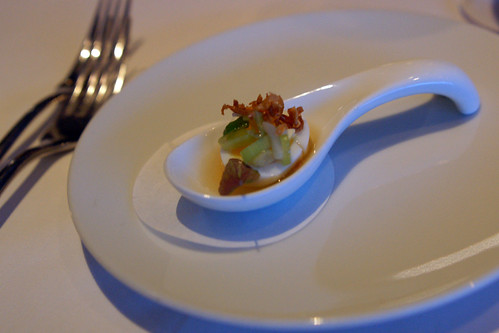
The meal started with a complimentary amuse-bouche -- butter beef with broth.  It was a nice plate to start off the meal with because it was refreshing with a little bit of citrusy taste and I also liked that it was beautifully plated.


For the follow on courses, K and I were served completely different dishes.  That means we got to taste 8 different dishes for the entire meal and made me feel like we got more of our money worth.

My first course was a tuna tartar.  When I only tasted the tuna alone at the beginning, I found the tuna was mushier than I expected, however, once I combined the chips that it came with, it enhanced its texture and it was a new way to have a tuna tartar, a way that I liked and never thought of having a tuna tartar with before.  However, I did not enjoy the quail's egg on top and I wished they had skipped it because I did not like the lukewarm feeling of egg on top of the raw fish.  In addition, the chunks of carrots, turnips around the tartar made it look less delicate.


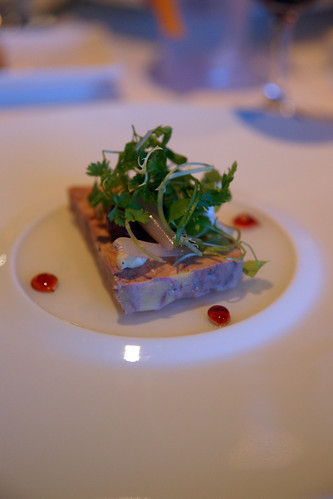
K's first course was a poached scallop with artichoke salad and he said it was refreshing.


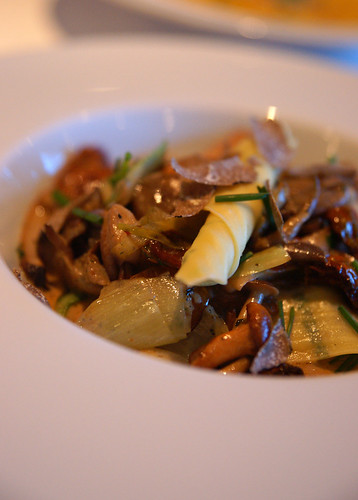
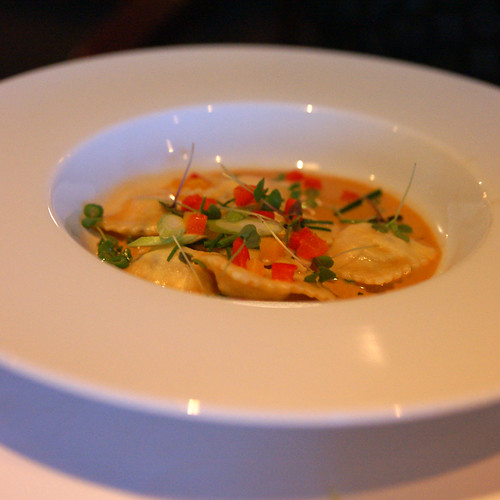
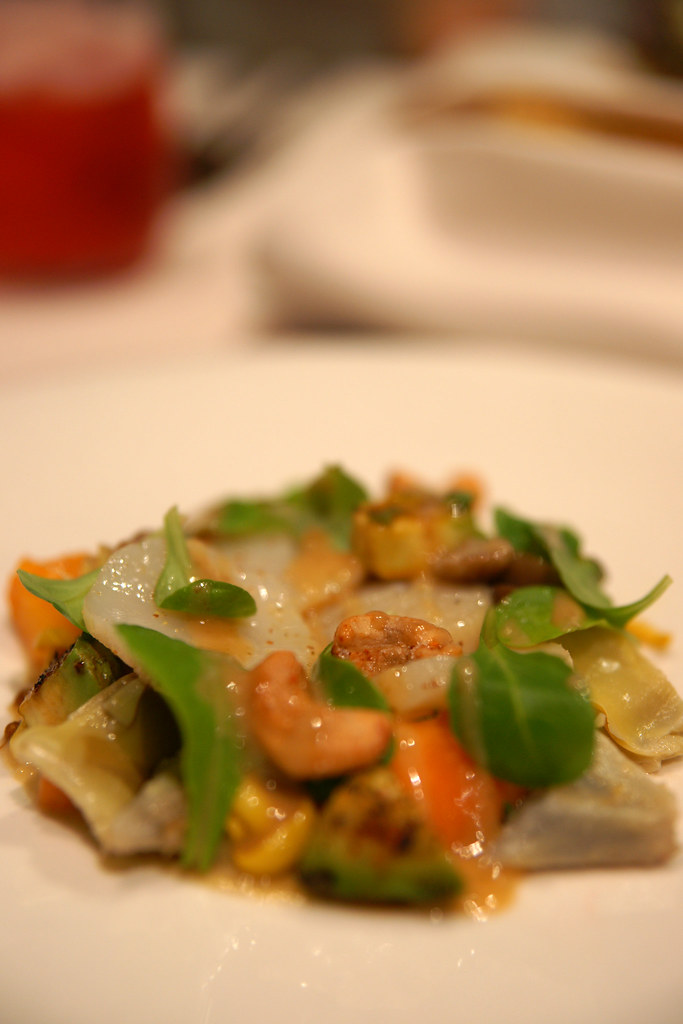
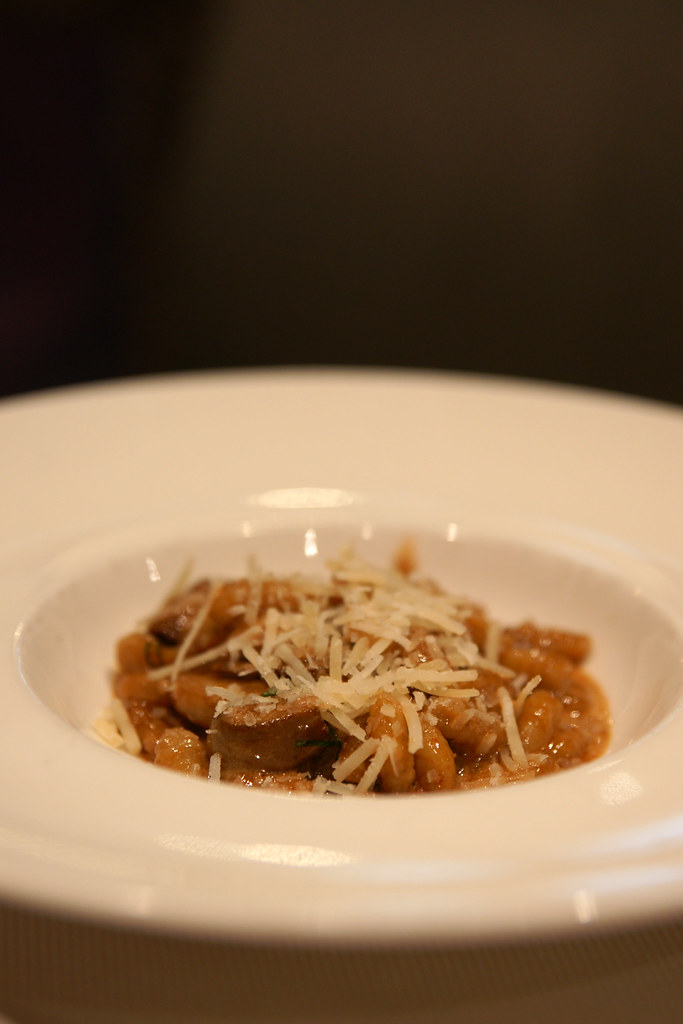
The second course was a pasta course, one was a gnocchetti with wild mushrooms and prosciutto.  It was a savoury dish and I found myself wanting more when I had my last gnocchetti.  The other pasta course was some kind of penne pasta with zuchini and goat cheese.  At first, we found the ingredients too ordinary, however, it was surprisingly good once we tasted it and the texture of the pasta was very light and airy (a texture that is better than al dente, but I don't know how to describe it).


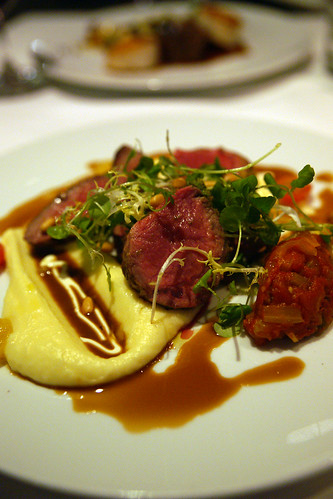
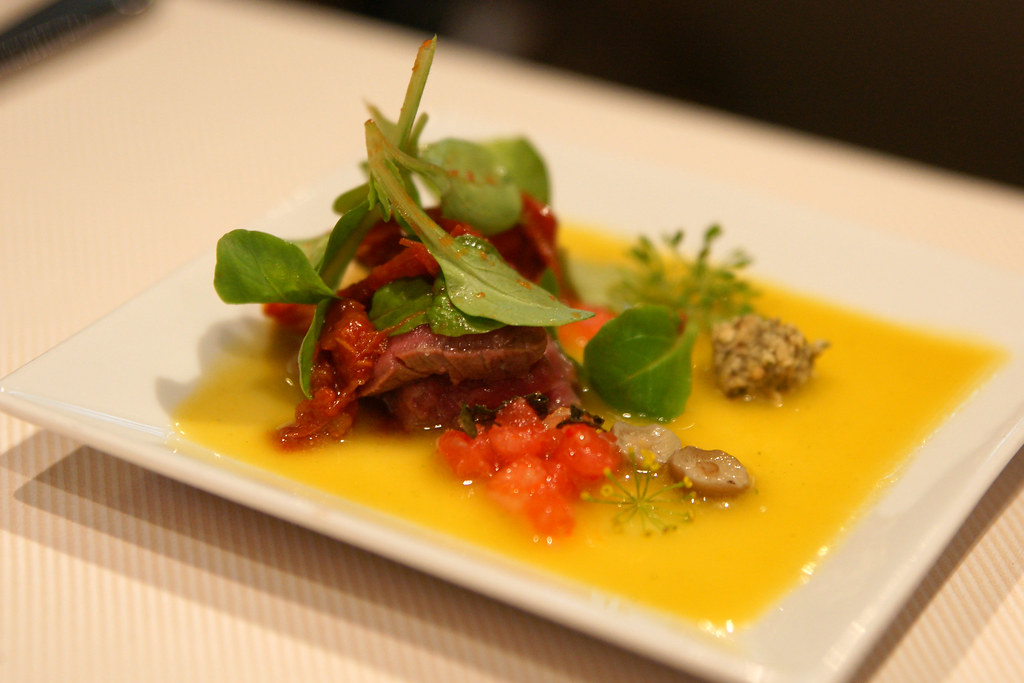
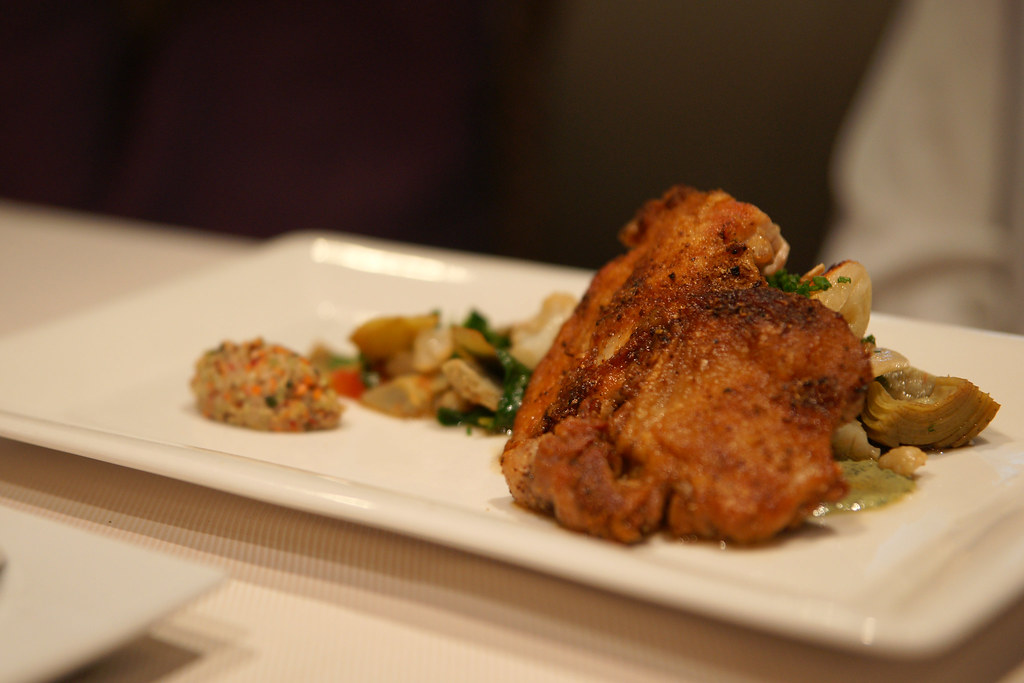
My third course was a corn hen with artichoke which was very tender and juicy and K's thrid course was tenderloin which we also liked too.


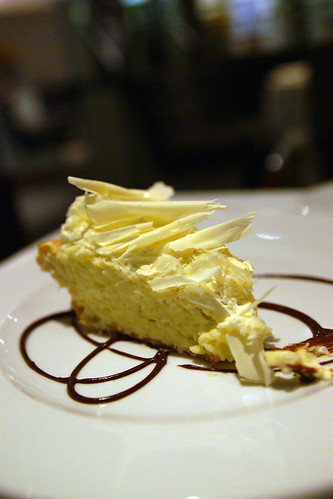
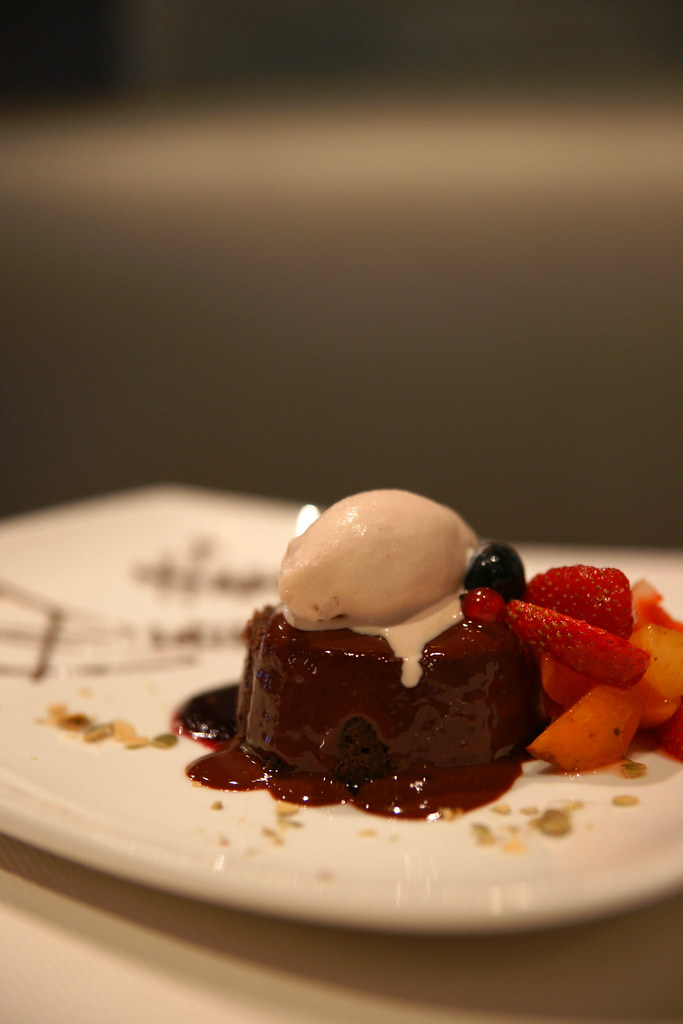
For our dessert course, they were good but no surprises.  I had a coconut tapioca with berries which tasted good but reminded me of the dessert that you would have in a Chinese restaurant and K had a chocolate cake with sorbet. 


Overall, we enjoyed our lunch break at George.  We liked all of our dishes with the pasta dishes as our highlights.  In addition, presentation of each dish was impeccable and the inside ambiance of the restaurant was quiet, modern, and gorgeously decorated.


111C Queen St. E 
Toronto, ON 
M5C 1S2  

Tel: 416 863-6006 
 
George on Urbanspoon

... more ...

Monday, August 6, 2012

0 comments 8/06/2012

Shrimp and Scallops Fusilli with Pesto Sauce

Posted by SnOwySnOwy - Filed under , ,
Last night, I made pesto sauce for the first time by following this simple recipe. I am using my Baby Bullet as my food processor more and more often now that Baby J doesn't need to eat pureed food anymore and I find it convenient to use because of its size and power. It is becoming one of the most used small kitchen appliances in my home now. ^^


Since the pesto sauce was for Baby J as well, I purposely blended it extra smooth just to ensure the nuts won't get stuck in his teeth. This Shrimp and Scallops Fusilli with Pesto Sauce turned out to be a success, both K and Baby J loved it. ^^


Pesto Sauce

ingredients

  • 3 cups fresh basil leaves
  • 1 1/2 cups chopped walnuts
  • 4 cloves garlic, peeled
  • 1/4 cup grated Parmesan cheese
  • 1 cup olive oil
  • salt and pepper to taste

preparation

In a food processor, blend together basil leaves, nuts, garlic, and cheese. Pour in oil slowly while still mixing. Stir in salt and pepper.

Yields 16 servings.

... more ...